It won't look same as the storyboard I uploaded. The butterflies fly following the path so It doesn't look like flock, It looks like thin line of butterflies. I tried to make them as flock but it looked a bit scary. So I changed to make their path as narrow.
30 March 2011
Final work : Compositing Flower, Sky and ButterflyFlow
I imported Sky to Flower scene and tried to import ButterflyFlow as well, but my maya kept crashing whenever I import ButterflyFlow. To solve the problem, I export the camera path from ButterflyFlow and import only the camera to Flower scene. Whole range of video is 500 frame. From 1 to 300 frame, I only rendered Flower scene and from 301 to 500 frame, rendered separately Flower scene and ButterflyFlow scene.
It won't look same as the storyboard I uploaded. The butterflies fly following the path so It doesn't look like flock, It looks like thin line of butterflies. I tried to make them as flock but it looked a bit scary. So I changed to make their path as narrow.
It won't look same as the storyboard I uploaded. The butterflies fly following the path so It doesn't look like flock, It looks like thin line of butterflies. I tried to make them as flock but it looked a bit scary. So I changed to make their path as narrow.
17 March 2011
Particle Example 8 : Realistic Cloud
You wouldn't see any small particle elements in this tutorial. This post will be about making realistic clouds using particle expression. This is for the sky environment that I made for Post Production Project.
1. Set the Dynamics menu set, select Fluid Effects - Create 3D container - Option box.
Set the following options, Apply.
Resolution X, Y, Z : 50, 5, 50
Size X, Y, Z : 50, 5, 50

2. Go to Attribute Editor - Contents Method.
Density : Off(zero)
Velocity : Off(zero)
Temperatur : Off(zero)
3. Scroll down and set the values, inputs and colours as below.
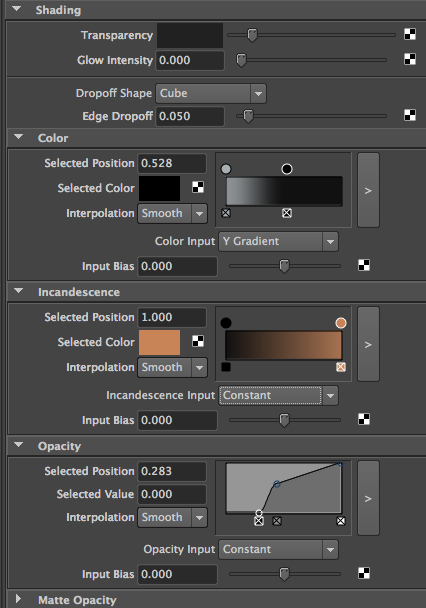
4. Check Texture Incandescence and set values as below.

5. To animate the clouds, Go to the Texture attribute under attribute editor.
Right mouse button click on the Z axis of Texture Origin, select Create New Expression.
Type in
fluidShape1.textureOriginZ = time*0.2;


6. Playback the animation.
7. Play around with implode. As value of implode increases, clouds seem to collide in the middle. Maybe they can be used as explosion.
1. Set the Dynamics menu set, select Fluid Effects - Create 3D container - Option box.
Set the following options, Apply.
Resolution X, Y, Z : 50, 5, 50
Size X, Y, Z : 50, 5, 50

2. Go to Attribute Editor - Contents Method.
Density : Off(zero)
Velocity : Off(zero)
Temperatur : Off(zero)
3. Scroll down and set the values, inputs and colours as below.
4. Check Texture Incandescence and set values as below.
 |
| View from below |
5. To animate the clouds, Go to the Texture attribute under attribute editor.
Right mouse button click on the Z axis of Texture Origin, select Create New Expression.
Type in
fluidShape1.textureOriginZ = time*0.2;

6. Playback the animation.
7. Play around with implode. As value of implode increases, clouds seem to collide in the middle. Maybe they can be used as explosion.
 |
| Implode = 0 |
 |
| Implode = 1 |
 | |
| Implode = 2 |
 | |
| implode = 3 |
Reference
- http://www.sharecg.com/v/5501/browse/Text-Entry-Tutorial/Making-Realistic-looking-Clouds-In-Maya
13 March 2011
Combination Example : Flow and Particle Expression
To make the scene that the butterfly flying up from opening flower, I came up an idea using particle expressions we have been through. Particle Instancing is the key element of this scene because it can make the bunch of flying butterflies. I will connect the particle instance to the flow so the butterflies can emit following the guide funnel. It is not as complicate as it sounds.
First, we will make the Flow which will be the guide funnel for butterflies.
1. Create new scene. Create - EP Curve Tool and creat a curve as below picture in the front
view.

2. Name the curve to butterflyCurve. With the curve selected and select Create Deformer -
Lattice - Option box in the Animation menu set. Set the following and press Create.
Divisions : 5, 9, 2
Autoparent to Selection : On
3. Select the ffd1Lattice node, Right mouse click on it and select Lattice Point. Select the top
three rows of lattice points.
4. Select Deform - Create Cluster - Option box. Check the Relative Mode on. Create.
Repeat this step to create two more clusters.

5. Select the three clusters in the outliner, then Shift - select the butterflyCurve. Press P to parent
the clusters to the curve.
6. Select tornadoCurve. At this time, butterflies are emitting out from the flower
so we won't keyframe translations.
7. Select butterflyCurveShape by pressing ↓key on the keyboard.
8. Change to Dynamics menu set, select Effects - Create Curve Flow - Option box.
Set the following and Create.
Flow Group Name : butterflyFlow
Num Control Sefments : 6
Particle Lifespan : 3
Goal Weight : 0.5

9. Playback the animation.
10. Select the control_Circle_6 which is at the top of butterflyCurve and scale up the circle.
Scale up the lower circles as look like below picture.

11. Select the tornadoFlow and set Display Thickness on in the channel box. You will see
the outline of butterfly funnel shape. Control the scale until you get the shape you want
and set Display Thickness off again.

15. Select the butterflyFlow_particles, go to Fields - Vortex - Option box. Set the following.
Create.
Magnitude : 10
Attenuation : 0

16. Parent the vortex field to butterflyCurve.
17. Select the butterflyCurveShape, Shift - select the vortex field. It will be easy to select in
outliner. Select Fields - Use Selected as Source of Field.
18. Select vortex field, set Apply Per Vertex to On in the channel box. It will make every
point on the curve emit field force.
Now, we will connect butterfly to flow.
19. Make simple butterfly model and duplicate 8 times. Arrange them on the Y axis.
Hide the original butterfly. Rotate the wings of each duplicates as below.

20. Select butterfly1 through butterfly8 in order in the Outliner.
Select Particles - Instancer (Replacement) - Option box. Set the following options. Create.
Particle Instancer Name : butterflyInstancer
Cycle : Se1uential
Cycle Step Size : 1
Make sure the butterfly1 to butterfly8 are in the Instanced Objects.

21. Hide butterflyParticles. Playback the animation.

First, we will make the Flow which will be the guide funnel for butterflies.
1. Create new scene. Create - EP Curve Tool and creat a curve as below picture in the front
view.

2. Name the curve to butterflyCurve. With the curve selected and select Create Deformer -
Lattice - Option box in the Animation menu set. Set the following and press Create.
Divisions : 5, 9, 2
Autoparent to Selection : On
3. Select the ffd1Lattice node, Right mouse click on it and select Lattice Point. Select the top
three rows of lattice points.
4. Select Deform - Create Cluster - Option box. Check the Relative Mode on. Create.
Repeat this step to create two more clusters.

5. Select the three clusters in the outliner, then Shift - select the butterflyCurve. Press P to parent
the clusters to the curve.
6. Select tornadoCurve. At this time, butterflies are emitting out from the flower
so we won't keyframe translations.
7. Select butterflyCurveShape by pressing ↓key on the keyboard.
8. Change to Dynamics menu set, select Effects - Create Curve Flow - Option box.
Set the following and Create.
Flow Group Name : butterflyFlow
Num Control Sefments : 6
Particle Lifespan : 3
Goal Weight : 0.5

9. Playback the animation.
10. Select the control_Circle_6 which is at the top of butterflyCurve and scale up the circle.
Scale up the lower circles as look like below picture.

11. Select the tornadoFlow and set Display Thickness on in the channel box. You will see
the outline of butterfly funnel shape. Control the scale until you get the shape you want
and set Display Thickness off again.

15. Select the butterflyFlow_particles, go to Fields - Vortex - Option box. Set the following.
Create.
Magnitude : 10
Attenuation : 0

16. Parent the vortex field to butterflyCurve.
17. Select the butterflyCurveShape, Shift - select the vortex field. It will be easy to select in
outliner. Select Fields - Use Selected as Source of Field.
18. Select vortex field, set Apply Per Vertex to On in the channel box. It will make every
point on the curve emit field force.
Now, we will connect butterfly to flow.
19. Make simple butterfly model and duplicate 8 times. Arrange them on the Y axis.
Hide the original butterfly. Rotate the wings of each duplicates as below.
20. Select butterfly1 through butterfly8 in order in the Outliner.
Select Particles - Instancer (Replacement) - Option box. Set the following options. Create.
Particle Instancer Name : butterflyInstancer
Cycle : Se1uential
Cycle Step Size : 1
Make sure the butterfly1 to butterfly8 are in the Instanced Objects.
21. Hide butterflyParticles. Playback the animation.

Reference
- Autodesk Maya 2011, 2010. Autodesk Maya Online Help : Introduction. [online] Available at : < file:///Applications/Autodesk/maya2011/docs/Maya2011/en_US/index.html?url=./files/GS_Introduction.htm,topicNumber=d0e1838 > [Accessed 25 February 2011].
- Marc-André Guindon., 2005. Learning Maya 7 : The Special Effects Handbook. Unknown: Sybex
12 March 2011
Particle Example 7 : Particle Instancing Pt.2
In the Particle Instancing Pt.1, we made a bunch of flies. It moved in the same fashion and looked robotic. This time we will make Instance cycling to randomly animate a flock of flies.
1. Create new scene and make the fly same as Pt.1. or you can use the same fly from Pt.1.
Select the fly group in the outliner. Duplicate the group 8 times. Arrange them on the Y axis.
Make sure you do not mess the flies geometry while moving them. It will cause offsetting
from the particles during instancing.
2. Hide the original fly. Rotate the wings of each duplicated flies as below.

3. Select Particles - Particle Tool - Option box. Setting as following and create.
Particle name : flyParticles
Number of particles : 20
Maximum radius : 40
4. Select fly1 through fly 8 in order in Outliner. The order will determine the cycling
order used by the instancer.
5. Select Particles - Instancer (Replacement) - Option box. Set as the following and Create.
Particle Instancer Name : flyInstancer
Cycle : Sequential
Cycle Step Size : 1

6. Hide fly1 through fly8. Playback the animation. All flies move in the same fashion.
7. Select flyParticles and open the Attribute Editor. Go to Add Dynamic Attribute - General.
Under the new tab, set the following options.
Attribute Name : customAge
Data Type : Float
Attribute Type : Per Particle (Array)
Add Initial State Attribute : ON
8. Right mouse click on customAge Attribute and select Runtime Expression Before Dynamics.
if (particleId ==0)
customAge = age;
else if (particleId ==1)
customAge = age * 0.5;
else if ((particleId % 2 == 0) && (particleId % 3 == 0))
customAge = age * 0.25 * particleId / 4;
else if (particleId % 2 == 0)
customAge = age* 0.4 * particleId / 4;
else if (particleId % 3 == 0)
customAge = age * 0.35 * particleId / 4;
else
customAge = age * 0.2 * particleId / 4;
9. Select flyParticles, set Particle Render Type to Numeric. You can see which particle
will be affected by which portion of the expression.
10. Go to flyParticles' Attribute Editor - Instancer (Geometry Replacement) - Cycle Option
- Age pull down menu, select customAge.
11. At the flyParticles Attribute Editor - Add Dynamic Attribute - General. Under the
new tab, set the following options.
Attribute Name : startPick
Data Type : Float
Attribute Type : Per Particle (Array)
Add Initial State Attribute : ON
12. Add creation expression to startPick attribute.
if ( particleId == 0 )
startPick = 0;
else if ( particleId ==1 )
startPick = 1;
else if ( ( particleId % 2 == 0 ) && ( particleId % 3 == 0 ))
startPick = 2;
else if ( particleId % 2 == 0 )
startPick = 3;
else if ( particleId % 3 == 0 )
startPick = 4;
else
startPick = 5;
14. Playback the animation.
1. Create new scene and make the fly same as Pt.1. or you can use the same fly from Pt.1.
Select the fly group in the outliner. Duplicate the group 8 times. Arrange them on the Y axis.
Make sure you do not mess the flies geometry while moving them. It will cause offsetting
from the particles during instancing.
2. Hide the original fly. Rotate the wings of each duplicated flies as below.

3. Select Particles - Particle Tool - Option box. Setting as following and create.
Particle name : flyParticles
Number of particles : 20
Maximum radius : 40
4. Select fly1 through fly 8 in order in Outliner. The order will determine the cycling
order used by the instancer.
5. Select Particles - Instancer (Replacement) - Option box. Set as the following and Create.
Particle Instancer Name : flyInstancer
Cycle : Sequential
Cycle Step Size : 1

- A cycle setting of Sequential causes the instancer to cycle through the object indices in sequence rather than not using any cycling at all. A Cycle Step Size of 1 causes the instancer to display each object index for 1 frame before changing to the next item in the list.
6. Hide fly1 through fly8. Playback the animation. All flies move in the same fashion.
7. Select flyParticles and open the Attribute Editor. Go to Add Dynamic Attribute - General.
Under the new tab, set the following options.
Attribute Name : customAge
Data Type : Float
Attribute Type : Per Particle (Array)
Add Initial State Attribute : ON
8. Right mouse click on customAge Attribute and select Runtime Expression Before Dynamics.
if (particleId ==0)
customAge = age;
else if (particleId ==1)
customAge = age * 0.5;
else if ((particleId % 2 == 0) && (particleId % 3 == 0))
customAge = age * 0.25 * particleId / 4;
else if (particleId % 2 == 0)
customAge = age* 0.4 * particleId / 4;
else if (particleId % 3 == 0)
customAge = age * 0.35 * particleId / 4;
else
customAge = age * 0.2 * particleId / 4;
- Each particle has unique particleId. By using the particleId, it controls this duration on a per particle basis. This is accomplished by multiplying the particleId by the age and saving the result in Age control we made above.
9. Select flyParticles, set Particle Render Type to Numeric. You can see which particle
will be affected by which portion of the expression.
10. Go to flyParticles' Attribute Editor - Instancer (Geometry Replacement) - Cycle Option
- Age pull down menu, select customAge.
11. At the flyParticles Attribute Editor - Add Dynamic Attribute - General. Under the
new tab, set the following options.
Attribute Name : startPick
Data Type : Float
Attribute Type : Per Particle (Array)
Add Initial State Attribute : ON
12. Add creation expression to startPick attribute.
if ( particleId == 0 )
startPick = 0;
else if ( particleId ==1 )
startPick = 1;
else if ( ( particleId % 2 == 0 ) && ( particleId % 3 == 0 ))
startPick = 2;
else if ( particleId % 2 == 0 )
startPick = 3;
else if ( particleId % 3 == 0 )
startPick = 4;
else
startPick = 5;
- After step 11, all flies begin their sequence at their fly1 position. You can change the object index the sequence starts on by setting the CycleStartObject attribute in the instancer. To do this, you will create another custom attribute (above). It controls CycleStartObject on a per particle basis.
14. Playback the animation.
Reference
- Autodesk Maya 2011, 2010. Autodesk Maya Online Help : Introduction. [online] Available at : < file:///Applications/Autodesk/maya2011/docs/Maya2011/en_US/index.html?url=./files/GS_Introduction.htm,topicNumber=d0e1838 > [Accessed 25 February 2011].
- Marc-André Guindon., 2005. Learning Maya 7 : The Special Effects Handbook. Unknown: Sybex
09 March 2011
Particle Example 6 : Particle Instancing Pt.1
As I cleared in the second post, I was looking for the way connecting animated object to particles node. I found I can make the scene by using Particle Instancing. Although, Instancing is like connecting the master object with particles so I need to animate particles as well. However, it will save a lot of time than animating bunch of butterflies individually. In this post, the focus will be on instancing object with particles first.
Instancing?
An instance is similar to a duplicated object but the difference is, it is not actual object. Let's say you are in a room surrounded by 100 mirrors. If you lift one leg, many of you in the mirror will lift one leg too. But it doesn't mean every you in 100 mirrors are "actual" you.
An instance contains no actual surface information, but is just a redrawn version of an original object. The original object acts like a master to all of its instances like you in the mirror room. Instances will be updated as the original is updated on all shading and surface characteristics.
Instances contain less information than duplicates so they can be handled and redrawn faster.
Particle Instancing
Particle instancing is the process of using the position and behaviour of particles to control the position and behaviour of instanced geometry. Although some complex results can be obtained using particle instancing, it is important not to interpret it as a full-featured behaviour animation system or flocking system. There are no behavioural relationships between the individual instanced elements.
1. Create new scene. Make any fly looking object with polyCylinder and polyPlane, it doesn't need to be descent looking. If you already have a model, use it. I made the model like below, renamed and made a group.

2. Animate and keyframe both wings frame by frame.
Frame 1 : wings down
Frame 2 : wings straight
Frame 3 : wings up
Frame 4 : wings straight
Frame 5 : wings down
3. Select both wings, go to Window - Animation Editors - Graph Editor.
Set the Pre-Infinity and Post-Infinity to Cycle. It will make the fly flap its wings repeatedly.

4. Select Particle - Particle Tool - Option box. Set the following.
Particle Name : flyParticles
Conserve : 1
Create Particle Grid : On
Particle Spacing : 12
Placement : With Text Fields
Minimum Corner : -25, 0, -25
Maximum Corner : 25, 0, 25
Click anywhere in the viewport and press Enter.
5. Add below expressions as creation expression in the position attribute under Per Particle
Attributes of flyParticles.
float $randY = rand (-3,3);
float $randXZ = rand (-1, 1);
vector $offset = <<$randXZ , $randY, $randXZ>>;
position = position + $offset;

6. After create the expression, Rewind the time slider to offset the particles.
7. With theflyParticles selected, select Solvers - Initial State - Set for Selected.
Delete the creation expression.
8. Select the fly group in the outliner. Select Particles - Instancer (Replacement) - Option box.
Set Particle Instancer Name to flyInstanced. Make sure the fly is the only listed object
in the Instanced Objects list. Press Create.
9. Select the original fly group and hide it by pressing Ctrl+h.
10. Open the flyParticlesShape attribute editor. Select Add Dynamic Attributes - General.
Set the following under the New tab and press OK.
Attribute Name : flyScaler
Data Type : Vector
Attribute Type : Per Particle Array
Add Initial State Attribute : ON

11. Right mouse click onto the box next to flyScaler in the Per Particle Attribute,
select Creation Expression. Type following expression and Create.
$rand = rand (0.4, 1.5);
flyScaler = <<$rand, $rand, $rand>>;
12. Select flyParticleShape, expand the Instancer (Geometry Replacement) tab.
Under General Option, Set Scale to flyScale.
13. Delete the flyScale creation expression. Select Solvers - Initial State - Set for Selected.
14. Select particle object and select Fields - Uniform. Set the following settings
Direction X, Y, Z : 1, 0, 0
Magnitude : 15
Attenuation : 0
15. Playback the animation.
Analyze Expression
1. Randomly offset the particles
float $randY = rand (-3,3) :
Get random value between -3 and 3 into float type variable called $randY
float $randXZ = rand (-1, 1) :
Get random value between -1 and 1 into float type variable called $randXZ
vector $offset = <<$randXZ, $randY, $randXZ >> :
vector type $offset is evaluated by the components $randXZ, $randY, $randXZ
position = position + $offset :
The value of position is assigned by the sum of default position value and $offset
2. flyScaler
$rand = rand (0.4, 1.5) :
$rand's value is evaluated by random number between 0.4 and 1.5 for each particle
flyScaler = <<$rand, $rand, $rand>>;
Value of flyScaler is assigned by the vector value which has $rand as X, Y, Z components.
Instancing?
An instance is similar to a duplicated object but the difference is, it is not actual object. Let's say you are in a room surrounded by 100 mirrors. If you lift one leg, many of you in the mirror will lift one leg too. But it doesn't mean every you in 100 mirrors are "actual" you.
An instance contains no actual surface information, but is just a redrawn version of an original object. The original object acts like a master to all of its instances like you in the mirror room. Instances will be updated as the original is updated on all shading and surface characteristics.
Instances contain less information than duplicates so they can be handled and redrawn faster.
Particle Instancing
Particle instancing is the process of using the position and behaviour of particles to control the position and behaviour of instanced geometry. Although some complex results can be obtained using particle instancing, it is important not to interpret it as a full-featured behaviour animation system or flocking system. There are no behavioural relationships between the individual instanced elements.
1. Create new scene. Make any fly looking object with polyCylinder and polyPlane, it doesn't need to be descent looking. If you already have a model, use it. I made the model like below, renamed and made a group.

2. Animate and keyframe both wings frame by frame.
Frame 1 : wings down
Frame 2 : wings straight
Frame 3 : wings up
Frame 4 : wings straight
Frame 5 : wings down
3. Select both wings, go to Window - Animation Editors - Graph Editor.
Set the Pre-Infinity and Post-Infinity to Cycle. It will make the fly flap its wings repeatedly.
4. Select Particle - Particle Tool - Option box. Set the following.
Particle Name : flyParticles
Conserve : 1
Create Particle Grid : On
Particle Spacing : 12
Placement : With Text Fields
Minimum Corner : -25, 0, -25
Maximum Corner : 25, 0, 25
Click anywhere in the viewport and press Enter.
5. Add below expressions as creation expression in the position attribute under Per Particle
Attributes of flyParticles.
float $randY = rand (-3,3);
float $randXZ = rand (-1, 1);
vector $offset = <<$randXZ , $randY, $randXZ>>;
position = position + $offset;
6. After create the expression, Rewind the time slider to offset the particles.
7. With theflyParticles selected, select Solvers - Initial State - Set for Selected.
Delete the creation expression.
8. Select the fly group in the outliner. Select Particles - Instancer (Replacement) - Option box.
Set Particle Instancer Name to flyInstanced. Make sure the fly is the only listed object
in the Instanced Objects list. Press Create.
9. Select the original fly group and hide it by pressing Ctrl+h.
10. Open the flyParticlesShape attribute editor. Select Add Dynamic Attributes - General.
Set the following under the New tab and press OK.
Attribute Name : flyScaler
Data Type : Vector
Attribute Type : Per Particle Array
Add Initial State Attribute : ON
11. Right mouse click onto the box next to flyScaler in the Per Particle Attribute,
select Creation Expression. Type following expression and Create.
$rand = rand (0.4, 1.5);
flyScaler = <<$rand, $rand, $rand>>;
12. Select flyParticleShape, expand the Instancer (Geometry Replacement) tab.
Under General Option, Set Scale to flyScale.
13. Delete the flyScale creation expression. Select Solvers - Initial State - Set for Selected.
14. Select particle object and select Fields - Uniform. Set the following settings
Direction X, Y, Z : 1, 0, 0
Magnitude : 15
Attenuation : 0
15. Playback the animation.
Analyze Expression
1. Randomly offset the particles
float $randY = rand (-3,3) :
Get random value between -3 and 3 into float type variable called $randY
float $randXZ = rand (-1, 1) :
Get random value between -1 and 1 into float type variable called $randXZ
vector $offset = <<$randXZ, $randY, $randXZ >> :
vector type $offset is evaluated by the components $randXZ, $randY, $randXZ
position = position + $offset :
The value of position is assigned by the sum of default position value and $offset
2. flyScaler
$rand = rand (0.4, 1.5) :
$rand's value is evaluated by random number between 0.4 and 1.5 for each particle
flyScaler = <<$rand, $rand, $rand>>;
Value of flyScaler is assigned by the vector value which has $rand as X, Y, Z components.
Reference
- Autodesk Maya 2011, 2010. Autodesk Maya Online Help : Introduction. [online] Available at : < file:///Applications/Autodesk/maya2011/docs/Maya2011/en_US/index.html?url=./files/GS_Introduction.htm,topicNumber=d0e1838 > [Accessed 25 February 2011].
- Marc-André Guindon., 2005. Learning Maya 7 : The Special Effects Handbook. Unknown: Sybex
08 March 2011
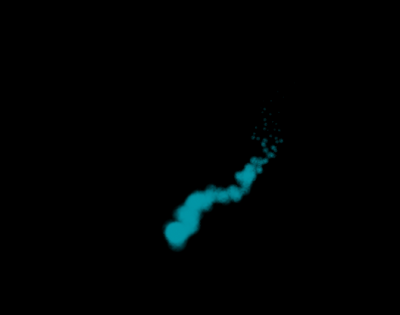
Particle Example 5 : Flow
In this tutorial, we will make a tornado. Not like earlier examples, it doesn't have any expressions. It will be easier to follow!
1. Create new scene. Create - EP Curve Tool and creat a curve as below picture in the front
view.
2. Name the curve to tornadoCurve. With the curve selected and select Create Deformer -
Lattice - Option box in the Animation menu set. Set the following and press Create.
Divisions : 5, 9, 2
Autoparent to Selection : On
3. Select the ffd1Lattice node, Right mouse click on it and select Lattice Point. Select the top
three rows of lattice points.
4. Select Deform - Create Cluster - Option box. Check the Relative Mode on. Create.
Repeat this step to create two more clusters.
5. Select the three clusters in the outliner, then Shift - select the tornadoCurve. Press P to parent
the clusters to the curve.
6. Select tornadoCurve. Set the time slider at frame 1. Move tornadoCurve to -12, 0, 12
(Translate x, y, z). Press Shift+w to keyframe the translations.
7. Move the time slider to 110 and set another keyframe by pressing Shift+w.
8. At frame 160, move the tornadoCurve to 0, 0, 0 and press Shift+w.
9. At frame 300, move the tornadoCurve to -12, 0, -12 and press Shift+w.
10. Select tornadoCurveShape by pressing ↓key on the keyboard.
11. Change to Dynamics menu set, select Effects - Create Curve Flow - Option box.
Set the following and Create.
Flow Group Name : tornadoFlow
Num Control Sefments : 6
Particle Lifespan : 3
Goal Weight : 0.5
12. Playback the animation.
13. Select the control_Circle_6 which is at the top of tornadoCurve and scale up the circle.
Scale up the lower circles as look like below picture.
14. Select the tornadoFlow and set Display Thickness on in the channel box. You will see
the outline of tornado funnel shape. Control the scale until you get the shape you want
and set Display Thickness off again.
15. Select the tornadoFlow_particles, go to Fields - Vortex - Option box. Set the following.
Create.
Magnitude : 10
Attenuation : 0
16. Parent the vortex field to tornadoCurve.
17. Select the tornadoCurveShape, Shift - select the vortex field. It will be easy to select in
outliner. Select Fields - Use Selected as Source of Field.
18. Select vortex field, set Apply Per Vertex to On in the channel box. It will make every
point on the curve emit field force.
19. Select the tornadoFlow_particle and switch the Particle Render Type to Cloud(s/w)
in the channel box.
20. Go to Attribute Editor - Add Dynamic Attributes - General - under Particle tap - radiusPP.
Add radiusPP.

21. Right mouse click on the box next to radiusPP in Per Particle Attribute. Select Create Ramp.
Right mouse click again and select arrayMapper - Edit Ramp. Set the values of the ramp :
Radius starts at 0.1 and dies at 0.9.
22. Play the animation. Render the scene so that the tornado look blue.
1. Create new scene. Create - EP Curve Tool and creat a curve as below picture in the front
view.
2. Name the curve to tornadoCurve. With the curve selected and select Create Deformer -
Lattice - Option box in the Animation menu set. Set the following and press Create.
Divisions : 5, 9, 2
Autoparent to Selection : On
3. Select the ffd1Lattice node, Right mouse click on it and select Lattice Point. Select the top
three rows of lattice points.
4. Select Deform - Create Cluster - Option box. Check the Relative Mode on. Create.
Repeat this step to create two more clusters.
5. Select the three clusters in the outliner, then Shift - select the tornadoCurve. Press P to parent
the clusters to the curve.
6. Select tornadoCurve. Set the time slider at frame 1. Move tornadoCurve to -12, 0, 12
(Translate x, y, z). Press Shift+w to keyframe the translations.
7. Move the time slider to 110 and set another keyframe by pressing Shift+w.
8. At frame 160, move the tornadoCurve to 0, 0, 0 and press Shift+w.
9. At frame 300, move the tornadoCurve to -12, 0, -12 and press Shift+w.
10. Select tornadoCurveShape by pressing ↓key on the keyboard.
11. Change to Dynamics menu set, select Effects - Create Curve Flow - Option box.
Set the following and Create.
Flow Group Name : tornadoFlow
Num Control Sefments : 6
Particle Lifespan : 3
Goal Weight : 0.5
12. Playback the animation.
13. Select the control_Circle_6 which is at the top of tornadoCurve and scale up the circle.
Scale up the lower circles as look like below picture.
14. Select the tornadoFlow and set Display Thickness on in the channel box. You will see
the outline of tornado funnel shape. Control the scale until you get the shape you want
and set Display Thickness off again.
15. Select the tornadoFlow_particles, go to Fields - Vortex - Option box. Set the following.
Create.
Magnitude : 10
Attenuation : 0
16. Parent the vortex field to tornadoCurve.
17. Select the tornadoCurveShape, Shift - select the vortex field. It will be easy to select in
outliner. Select Fields - Use Selected as Source of Field.
18. Select vortex field, set Apply Per Vertex to On in the channel box. It will make every
point on the curve emit field force.
19. Select the tornadoFlow_particle and switch the Particle Render Type to Cloud(s/w)
in the channel box.
20. Go to Attribute Editor - Add Dynamic Attributes - General - under Particle tap - radiusPP.
Add radiusPP.
21. Right mouse click on the box next to radiusPP in Per Particle Attribute. Select Create Ramp.
Right mouse click again and select arrayMapper - Edit Ramp. Set the values of the ramp :
Radius starts at 0.1 and dies at 0.9.
22. Play the animation. Render the scene so that the tornado look blue.

Reference
- Autodesk Maya 2011, 2010. Autodesk Maya Online Help : Introduction. [online] Available at : < file:///Applications/Autodesk/maya2011/docs/Maya2011/en_US/index.html?url=./files/GS_Introduction.htm,topicNumber=d0e1838 > [Accessed 25 February 2011].
- Marc-André Guindon., 2005. Learning Maya 7 : The Special Effects Handbook. Unknown: Sybex
03 March 2011
Per Particle Attributes
After I uploaded emitter tutorial, I needed to define what "Per Particle (array) Attribute" is.

- Per Particle Attribute allows each particle to store its own value for a given attribute. That is why most expressions are applied to Per Particle Attributes. Per Particle Attribute can control each particles in object so that it can create complicated and variable particle effects. However, Per Particle Attribute cannot be keyframed, be used with other expression and it should be used only in particle expression.
- Some attributes has PP at the end their names. PP means Per Particle so it can be easily distinguished, but remember there are other Per Particle attributes like Position and Velocity which doesn't have PP at the end.
Reference
- Jo Sang Bum., 2002. programming with MAYA MEL & Expression. Seoul: Ahn Dae Sik
- Autodesk Maya 2011, 2010. Autodesk Maya Online Help : Introduction. [online] Available at : < file:///Applications/Autodesk/maya2011/docs/Maya2011/en_US/index.html?url=./files/GS_Introduction.htm,topicNumber=d0e1838 > [Accessed 25 February 2011].
- Marc-André Guindon., 2005. Learning Maya 7 : The Special Effects Handbook. Unknown: Sybex
Subscribe to:
Posts (Atom)