27 February 2011

Creation Expression VS Runtime Expression

You can apply creation expression and runtime expression to the particles. It can be used separately and both together at the same time. If you connect expression to ordinary object, you can set expressions to each different attributes, however, you can set creation expression and runtime expression to only one particle bearing no relation to attribute.


Creation expression evaluated only once for each particle when particle is born. If particles came out from emitter, these particles won't be affected by the expression after they born.

1.  Create new scene. Select Particle - Particle Tool - Option box. Check Creat particle grid. Click and drag to make particle on to the top view. Press Enter.


2.  Go to the particleShape node and scroll down to Add Dynamics Attribute. Click Color and add Per Particle Attribute.


3.  Right mouse button click on new RGB PP attribute box and select Creation expression. Enter below expression.

    particleShape1.rgbPP = <<rand(1), rand(1), rand(1)>>;


4.  Playback the animation. particle's colours look all same in frame 1, 10, 21. This is because the expression evaluated once at the particle birth.

Frame 1

Frame 10


Frame 21


Runtime expression evaluated at least once per particle per frame but not at particle birth. For the same instance as creation expression, particles from emitter will be affected by the expression
even after their birth.

1.  Create new scene and repeat 1 and 2 as above example.

2.  Right mouse click on to the RGB PP attribute box and click  
     Runtime expression before dynamics. Enter below expression.

     particleShape1.rgbPP = <<rand(1), rand(1), rand(1)>>;


3.  Playback the animation. You will see the colour of particles changes each every frames.


Creation expression and Runtime expression using at the same time

1.  Go to the rgbPP attribute of above runtime expression example. Right mouse click the box next to the RGBPP and select creation expression. Enter the below expression. Create.

     particleShape1.rgbPP = <<1, 1, 0.2>>;


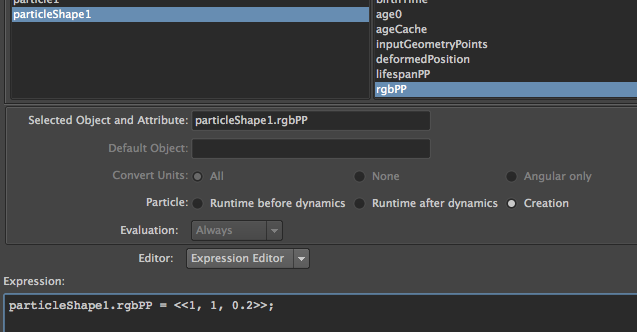
2. Now the particle RGBPP node has two expressions which are Runtime expression before dynamics and Creation expression. Playback the animation. At the frame 1, all particles will be yellow. After frame 2, particles' colour will change every frames.


Frame 1

Frame 10
Frame 21


Reference
  • Jo Sang Bum., 2002. programming with MAYA MEL & Expression. Seoul: Ahn Dae Sik
  • Autodesk Maya 2011, 2010. Autodesk Maya Online Help : Introduction. [online] Available at : < file:///Applications/Autodesk/maya2011/docs/Maya2011/en_US/index.html?url=./files/GS_Introduction.htm,topicNumber=d0e1838 > [Accessed 25 February 2011].
  • Marc-André Guindon., 2005. Learning Maya 7 : The Special Effects Handbook. Unknown: Sybex

26 February 2011

Particle Example 3 : Particle expression

As I described in the earlier post, there are two kinds of expressions which are ordinary and particle. In this post, we will use a particle expression to constrain the particles emitted by an Omni emitter to a surface that we define mathematically.

When to use a particle expression..

  • When you want to apply different forces to each particle,  making it difficult to use field.
  • When you have a well-defined mathematical model for your particles' behaviour. 
  • When you want to apply complex decision making to each particle's behaviour independently of the others in the particle object. 

  1. Create new scene. Select the Dynamic menu set. Go to Particles - Create Emitter and click option box.
  2. Set emitter type : Omni and leave other settings. Click Create. Playback your animation. You will see a cloud of particles being emitted in all directions.
  3. Drag over the particles and press Ctrl+A or open the Attribute Editor.
  4. Scroll down to Per Particle (array) Attributes and open the tab.
  5. Right click on the box of Position and choose Runtime expression After Dynamics. Enter the below expression. Creat.
          vector $pos = position;
          float $posY = ($pos.x) * ($pos.x) + ($pos.z) * ($pos.z);
          position = <<$pos.x, $posY, $pos.z>>;


     6.  Again, right click on the box of Position and open Creation expression.
          Enter the same expression as above. Create.
  • Runtime expressions are executed only on the frames after the first frame that a particle exist. If we didn't put our constraint into the creation expression, particles wouldn't stay on the surface during the first frame that they exist. We want our constraint to apply to all particles, that's why we made same expression as creation expression. I will explain difference between runtime expressions and creation expressions in the next post.
     7.  When you playback the animation, you will see the glitches under the paraboloid
          of particles. To prevent this, you should add some lines in the runtime expression
          and creation expression you have created before.

          vector $vel = velocity;
          velocity = <<$vel.x, 0, $vel.z>>;
 
     8.  Playback the animation and check if there are glitches under the paraboloid.


Analyze Expression


vector $pos = position : Create a vector variable called $pos. Set its value to the current
                                      particle's position.

float $posY = ($pos.x) * ($pos.x) + ($pos.z) * ($pos.z) :
  Create a float type variable called $posY. Its value is calculated by multyplaying the
  position X and Z  components by themselves and adding them.
  It's not possible to get the X and Z value of a particle's position by writing position.x.
  However, it is possible to get the X and Z value of the $pos variable by writing
  $pos.x and $pos.z.

position = <<$pos.x, $posY, $pos.z>> :
  Remember the vector variable has specific way to put values in it using
  " << Val X, Val Y, Val Z >>". Vector variable "position"'s value has decided by components
  $pos.x, $posY  and $pos.z.

 + added lines

vector $vel = velocity : Create a new vector variable called $vel and set its value to the
                                   current particle's velocity.

velocity = <<$vel.x, 0, $vel.z>> : setting the initial velocity in Y to 0 so that the particles
                                                    are not moved away from the surface.


Expressions After Dynamics


Choosing "Expressions After Dynamics" is important for the above expression to work properly.

If it's unchecked
  • expression execute first. When an expression examines the value of the particle's position or velocity, it sees the value those attributes had on the previous frame. Then, after the expression has had its opportunity to change the per-particle attributes, the dynamics engine applies the effect of forces created by fields and goals.
If its checked
  • It makes the dynamics engine run first. Then, when we examine position, we see the position established for the particle by the dynamics engine on this frame, and any changes we make establish the final value for the particle's position. 


Reference
  • Mark R.Wilkins and Chris Kazmier., 2003. MEL Scripting for Maya Animators. SanFrancisco: Diane D. Cerra
  • Marc-André Guindon., 2005. Learning Maya 7 : The Special Effects Handbook. Unknown: Sybex

    25 February 2011

    Particle Example 2 : Ordinary expressions and a Newton field

    There are two kinds of expressions which are ordinary expressions and particle expressions. Ordinary Expressions control per-object attributes. Particle expressions affect per-particle attributes and are executed differently from ordinary expressions. This example presents an ordinary expression being used to control particle behaviour that seem like a candidate for a particle expression.

    1.  Create a new scene. Set dynamic mode, go to Particle - Particle Tool.
         Click 10-20 times in the perspective view to make particles and press Enter.


    2.  Change the Particle Render Type to sphere in the channel box.


    3.  Switch into Component selection mode.

    4.  Drag and select all the particles. Go to Window - General Editors - Component Editor

    5.  Select the Velocity Y for all the particles. Make sure the time slider is at 0.

    6.  Type "1.0" into the box, initiate all Velocity Y value as 1.0. Close the Component Editor.


    7.  Switch into Object selection mode.

    8.  With the particles selected, select Fields - Newton to create a Newton field.

    Now, animate the centre point.

    9.  At the frame 0, press Shift-w to key selecting Translation X,Y, and Z.
    10. Drag time slide to 100-200 frame, move the newton field wherever you want to move
          but make sure the newton field is located within -5 or -6 in Translation Z value.
    11. At the 100~200 frame you set, with the newton field selected, press Shift-w.
    12. Playback your animation. Spheres will orbit around following the newton field.

    Adding the repulsion expression.

    13. Select the newton field. Open the Expression Editor (Window - Animation Editor - Expression Editor)

    14. Enter the below expression.

          if (tz > -5)
          {
               magnitude = 5.0;
           }
          else
          {
               magnitude = -35.0;
           }


    15. Click Create and playback your animation.


    Analyzing Expression

    This expression is for testing value of one attribute to control the behaviour of another.

    if (tz > -5) : If the value of translation Z is bigger than -5
    magnitude = 5.0 : The value of newton field's magnitude is set to 5.0. The newton field attracts the particles with a strength of 5.0

    else : When the value of translation Z is smaller than -5
    magnitude = -35.0 : The value of newton field's magnitude is -35.0. The newton field repels them with a strength of -35.0

    A newton field is the natural choice for the particles will orbit. When its magnitude turned to negative value, the newton field loose the strength and it forces the particles to fly outward.


    Reference
    • Mark R.Wilkins and Chris Kazmier., 2003. MEL Scripting for Maya Animators. SanFrancisco: Diane D. Cerra
    • Autodesk Maya 2011, 2010. Autodesk Maya Online Help : Introduction. [online] Available at : < file:///Applications/Autodesk/maya2011/docs/Maya2011/en_US/index.html?url=./files/GS_Introduction.htm,topicNumber=d0e1838 > [Accessed 25 February 2011].

    22 February 2011

    Particle Example 1 : Particle Galaxy

    As the first example, we will make a simple particle galaxy using Particle Tool. Particle Tool is easy and quick way to create individual particles, particle grids and random collections of particles.

    1.  Select Particles - Particle Tool - Option box.

    2.  Settings
            Particle Name : galaxy
            Number of Particles : 20
            Maximum Radius : 3
            Sketch Particles : On
            Sketch Interval : 5 

    3.  In the top view, click and drag cross shape. press Enter.


    4.  Select the galaxy particle object in the outliner. If you can't find the object, enable the
         option Display - Shapes in the outliner.

    5.  With the particle object selected, select Field - Vortex. Vortex field makes the particles
         spin.

    6.  Playback the animation and increase the time range if you need. You will see the particles
         going back to the cross shape whenever you play the animation.


    7.  Playback the animation until the particles are in a galaxy shape.
         With the galaxy selected, select Solver - Initial State - Set For Selected.
         This prevents the galaxy returns to the cross shape and initiate the particle shape looks
         like galaxy.

    8.  Select the galaxy, press ↓on your keyboard to open particleShape node or open
         the Attribute Editor by pressing Ctrl+A and click the "galaxyShape" tab.

    9.  Set Conserve to 0.8.
         By lowering the conserve value, it prevents the particles spinning out of control.

    10. Select the vortex and change the Magnitude to 200 in the channel box.

    11. Playback the animation. 


    Conserve

    Conserve is very important particle attribute. It is short for "Conservation of momentum." Default value is set to 1 : particles never lose any of their motion as they move through space.
    It is very sensitive attribute so lowering it very slightly is usually best. (ex. 0.99 : particles' motion will look more realistically.)


    Reference
    • Autodesk Maya 2011, 2010. Autodesk Maya Online Help : Introduction. [online] Available at : < file:///Applications/Autodesk/maya2011/docs/Maya2011/en_US/index.html?url=./files/GS_Introduction.htm,topicNumber=d0e1838 > [Accessed 25 February 2011].
    • Marc-André Guindon., 2005. Learning Maya 7 : The Special Effects Handbook. Unknown: Sybex

    20 February 2011

    Expression Example 1

    This time, we will experience simple examples of expression.

    Create expression

    1.  Set the new project and new scene. Set the time length long enough to playback the sequence such as 400 frames.
    2.  Type "sphere" in command line and press enter. It will create a new nurbs sphere.


    3.  Change the name of the sphere in channel box as "Ball".
    4.  Select the ball. Go to Window - Animation Editor - Expression Editor,  run Expression Editor.
    5.  Type in "ScaleBallWidth" in the box of Expression Name.
    6.  Type "Ball.scaleX = Ball.scaleZ = time +1;" in the expression box.
         You should distinguish upper and lower case correctly. Placing semicolon is important as well.
         It means the end of the expression.


    7. Click "Create" and playback the animation. If any error occurs, it will show in the response area next to the command line. You will see the ball expanding widely as time goes by.

    Analyze expression

    Above expression can be broken down as
        Ball.scaleX = time+ 1;
        Ball.scaleY = time+1;

    Ball.scaleX : scaleX attribute of "Ball" object
    Ball.scaleX = time+1 : setting the value of Ball.scaleX to time. "time" is predefined variable in maya and means the time (second) from the first frame to the current frame.
                   
       time = (Current frame - First frame) / frame per second

    By setting the scaleX and Y's value as time+1, it increases continuously.


    Create expression

    1. Create a new scene and create a sphere. Change the name of sphere to "Balloon".
        Select the sphere and go to Window - Animation Editor - Expression Editor.
        Type "RisingBalloon" in the expression name box, type below expression.

        if ( time <2 )
            Balloon.scaleY = time;
        if ( time >=2 )
            Balloon.translateY = time;

    Press Create and playback your animation. 


    Analyze expression

    if ( time < 2 ) : if time is less than 2

    Balloon.scaleY = time :
       Balloon's scaleY increases as time. It won't increases after 2, because it is no longer affected
       by if statement since time is same as 2.

    if ( time >= 2 ) : if time is greater than 2

    Balloon.translateY = time :
        When time is less than 2, it won't move but since when time is equal to 2, the Balloon's
        translateY will increase.
    Frame 1


    Frame 38


    Frame 86


    Reference
    • Jo Sang Bum., 2002. programming with MAYA MEL & Expression. Seoul: Ahn Dae Sik
    • Autodesk Maya 2011, 2010. Autodesk Maya Online Help : Introduction. [online] Available at : < file:///Applications/Autodesk/maya2011/docs/Maya2011/en_US/index.html?url=./files/GS_Introduction.htm,topicNumber=d0e1838 > [Accessed 25 February 2011].
    • Jeon Gye do, 2000. MEL 4 Artists. [online] Available at: <http://gyedo.pe.kr/zbxe/mayaExpression> [Accessed 25 February 2011]

    16 February 2011

    MEL and Expression : Conditional Statement

    Conditional statement make the attribute or variable follow the expression in condition of another attribute or variable. For instance, I can make object move at only certain point such as frame 50 to 100.
    The if and if - else statements are the most commonly used conditional statements in expressions.

    if statements

    The if conditional statement has below format.

           if ( condition ) 
                 statement;

     meaning : if condition is true, statement executes. The statement can be a single line or
                      a multi-line in a block.

    Example : The Ball's scaleY attribute to 2 after the animation plays 3 seconds.

          if (time > 3)
               Ball.scaleY = 2;


    else statements

    else conditional statement only works with if statement and has below format.

          if ( condition )
               statement 1;
          else
               statement 2;

    meaning : if condition is true, executes statement 1, otherwise execute statement 2.
                    The statement can be a single line or a multi-line in a block.

    Example : When time is less than 2, Ball.translateY =0 and Ball.scaleY = time.
                     When time is greater than 2, Ball.traslateY = time-2 and Ball.scaleY = 1.

          if ( time < 2 )
          {
               Ball.translateY = 0;
               Ball. scaleY = time;
           }
          else
          {
               Ball.translateY = time-2;
               Ball.scaleY = 1;
           }


    else if statements

    else if statement works with else statement and else has conditions.

           if ( condition 1 )
                statement 1; 
           else if ( condition 2 )
                statement 2;

    meaning : If condition 1 is true, executes statement 1 and skip the else if statement.
                     If condition 1 is false, not executing statement 1 and check if condition 2 is true.
                     If it is, execute condition 2.
                     If neither condition is true, neither statement executes.
                     The statement can be a single line or a multi-line in a block.

    Example : If time is less than 3, Ball.scaleY = 1, if time is greater than 3 or equal and
                     less than 6 or equal, Ball.scaleY = 2. If time is greater than 6, Ball.scaleY = 3.

           If ( time < 3 )
                 Ball.scaleY = 1;
           else if ((time >= 3) && (time =< 6))
                 Ball.scaleY = 2;
           else
                 Ball.scaleY = 3;

    You can use as many else if statement as you can but only one else statement in one if statement.


    Reference
    • Jo Sang Bum., 2002. programming with MAYA MEL & Expression. Seoul: Ahn Dae Sik
    • Autodesk Maya 2011, 2010. Autodesk Maya Online Help : Introduction. [online] Available at : < file:///Applications/Autodesk/maya2011/docs/Maya2011/en_US/index.html?url=./files/GS_Introduction.htm,topicNumber=d0e1838 > [Accessed 25 February 2011].
    • Jeon Gye do, 2000. MEL 4 Artists. [online] Available at: <http://gyedo.pe.kr/zbxe/mayaExpression> [Accessed 25 February 2011]

    13 February 2011

    MEL and Expression : Operators

    MEL has 4 kind of operators : Assignment, Arithmetic, Comparison, Conditional.

    Assignment : =

    Arithmetic : +, -, *, /, %, ^.
       * is multiply for integers and float and dot product for vectors.
       % is remainder of division.
       ^ is cross product for vector. it only works for vectors

    Comparison : Relational Operator , Logical Operator
    • Relational Operator :  compares between two conditions
              <   : less than
              >   : greater than
              == : equal to
              !=  : not equal to
              >= : greater than or equal to
              <= : less than or equal to

    If you use the "==" or "!=" between two vectors, they compares each component of vectors. The other operators compare the magnitude of two vectors. The magnitude of vector <<x, y, z>> is calculated by below expression.
    • Logical Operator :  decides True or False between two conditions
              ||    :  or  : True when only one of both conditions is true.
             &&: and : True when both conditions are true.
                 : not : True when right handed condition is false.

    Examples:
            if ( 0 || 1) : True
            if ( 0 && 1) : False
            if ( 2 && <<3, 7.7, 9>>) : True
            if ( ! 5.39 && 7) : False
            if ( <<0, 0, 0>> || 0) : False
            if ( ! <<0, 0, 0>>) :True

    Conditional : It has 3 conditions.
     
            Expression : conditional statement ? condition 2 : condition 3

    If the conditional statement is true, it operate condition 2. If the conditional statement is false, it operates condition 3.

    Example:
            float $src = rand(5)<3 ? 15 : 25

    rand(5) is picking a random floating point number within 5. If the random number is less than 3, which means true then $src assign 15. If the random number is greater than 3, which means false then $src assign 25.


    Operator precedence

    The precedence of operators in expression follows

    Highest  ⎯⎯⎯⎯⎯⎯⎯⎯⎯⎯⎯⎯⎯⎯⎯⎯⎯⎯⎯⎯⎯⎯⎯⎯⎯⎯⎯⎯⎯⎯→ Lowest


    ( ) [ ]  →  !   →  * / % ^  →  + -  →  < <= > >=  →  == !=  →  &&  →  ||  →  =


    References
    • Jo Sang Bum., 2002. programming with MAYA MEL & Expression. Seoul: Ahn Dae Sik
    • Autodesk Maya 2011, 2010. Autodesk Maya Online Help : Introduction. [online] Available at : < file:///Applications/Autodesk/maya2011/docs/Maya2011/en_US/index.html?url=./files/GS_Introduction.htm,topicNumber=d0e1838 > [Accessed 25 February 2011].
    • Jeon Gye do, 2000. MEL 4 Artists. [online] Available at: <http://gyedo.pe.kr/zbxe/mayaExpression> [Accessed 25 February 2011]

    MEL and Expression : Variables and Data types


    Variables

    A variable is like a place saves a changing value. You can assign a value to a variable or read a variable's value. All variables' name should be begin with '$'. It is upper and lower case sensitive and you can use number and underscore (_) in the name. Variables can be used after it has declared. When it is declared, it can be assigned memory from computer. When you declare a variable, type in data type of variable first and variable name with $ in front.

    Example :
                      int $temp;
                      float$Temp;
                      string $tEmp;
                      vector $teMp;

    Wrong example:
                      int temp;
                      float $te mp;

    MEL supports implicit declaration. Even if you didn't indicate its type, variable's typecan be evaluated by assigned data type.

    Example :
                     $temp = 0;                                   int
                     $Temp = 1.2;                               float
                     $sEmp = "Hello"                         string
                     $teMp = << 1.2, 4.3, 7.5 >>        vector

    Maya maintains values in two predefined variables as an animation plays.

    frame : float type, number of frames the animation has played.
    time : float type, time in seconds the animation has played.

    You can read their values but not set the values. The time updates as an animation plays. The value increases with the increasing frame number.

    time = frame / rate ( frame per second)

    rate can be different by NTSC or PAL. If it is NTSC, it will be 24 frames per second and if it is PAL, it will be 25 frames per second.


    Data Type

    int          : Integer numbers               : example (1, 0, -10 )
    float       : floating point numbers     : example ( 3.234, -4.52 )
    string     : one or more characters     : example ( "sphere", "plane" )
    boolean : on or off selection            : example ( on / off )

    Integer data types are rarely used and float type is the most common used. When you use boolean type, programme can't understand on and off when you type in "on" or "off". So it normally use int 0 and 1. In programming, 0 means False, No, Off and 1 means True, Yes, Off.

    Particle shape nodes have additional attribute data types.

    vector array   : array of vectors
        example attribute : ParticleShape.position
        example data : << 1.4, 5.2, 0.6 >>, << 3.34, 6.45, 8.3 >>

    you must type a vector in left, middle and right component in double brackets

    float array      : array of floating point numbers
        example attribute : ParticleShape.lifespan
        example data : 1.333
                                1.666
                                2.333
                                1.333

    In maya, a vector is a related group of three floating point numbers that set an attribute or variable.
    Vector array data types are useful for animating position, velocity, colour and other particle attributes made of three components.
    Float array data types are useful for setting lifespan, opacity and other particle attributes which have a single number value.


    Reference
    • Jo Sang Bum., 2002. programming with MAYA MEL & Expression. Seoul: Ahn Dae Sik
    • Autodesk Maya 2011, 2010. Autodesk Maya Online Help : Introduction. [online] Available at : < file:///Applications/Autodesk/maya2011/docs/Maya2011/en_US/index.html?url=./files/GS_Introduction.htm,topicNumber=d0e1838 > [Accessed 25 February 2011].
    • Jeon Gye do, 2000. MEL 4 Artists. [online] Available at: <http://gyedo.pe.kr/zbxe/mayaExpression> [Accessed 25 February 2011]

    11 February 2011

    MEL and Expression : Object and Attributes

    Object : existed objects in a scene such as nurbs shpere, polygon plane, ambient light, Phong shader, etc.


    These objects has original attributes. There are different types of attribute like attribute related to translation, rotation, scale ( translateX, rotateY, scaleZ), relate to shape (radius, spans), related to material (colorT, transparencyG, specularColorB) and many others.

    In maya, the concept of "Node" is much important than object. This node is the minimum element to consist a scene. One object can be consisted with many nodes, each node has its own unique attribute.


    nurbsSphere2 : Transform node


    nurbsSphereShape2 : Shape node


    Transform node has the value of translation, rotation, scale, Shape node has attributes related to its shape like radius.


    Reference
    • Jo Sang Bum., 2002. programming with MAYA MEL & Expression. Seoul: Ahn Dae Sik
    • Autodesk Maya 2011, 2010. Autodesk Maya Online Help : Introduction. [online] Available at : < file:///Applications/Autodesk/maya2011/docs/Maya2011/en_US/index.html?url=./files/GS_Introduction.htm,topicNumber=d0e1838 > [Accessed 25 February 2011].
    • Jeon Gye do, 2000. MEL 4 Artists. [online] Available at: <http://gyedo.pe.kr/zbxe/mayaExpression> [Accessed 25 February 2011]

    10 February 2011

    MEL and Expression : Elements of an expression

    Expression / MEL are made of one or more statements. Below example shows that statement has several elements.

    Ball.rotateZ = sim(time) * $magnitude + 6;

    Ball : Object name 

    The object name which is affected by this expression. Object means all exist light, camera, locator, shader, model in a scene.

    rotateZ : Attribute name

    The name of the attribute affected by this expression. Like rotateZ ,  there are attributes of object as translateX or scaleY. Attribute name can be seen as "Object.Attribute".

    = : Assignment Operator

    This is same as math. This operator assigns the attribute the result of the statement on the right side of =. Ball.rotateZ receives the value of the statement sin(time) + 6.

    Sin : Function

    This is the function that maya has. Function returns a special value by an entry called "argument". In this example, the argument is time. An argument places in the brackets (e.g, sin(time)) and if there are 2 or more arguments, they distinguished by ','.
       In this example, function Sin gets the argument Time and returns the value. When time is 0, the function returns 'sin(0)=0'. When time is 90, the function returns 'sin(90)=1'.

    time, $magnitude : variable

    A variable is like a place saves a changing value. You can assign a value to a variable or read a variable's value.
    The 'time' is a predefined in maya, which has the animation time at the current frame. You can red but not set the value these kind of predefined variable.
    '$magnitude' is defined by user, you wouldn't know what value it has by only this example. You can read and set the value for these kind of variable and the name should be begin with '$'.

    *, + : Arithmetic Operator

    An operation such as +, -, *, / or < (less). Apart from arithmetic operator, there is Logical Operator which operates AND, OR, NOT.

    6 : Constant

    An unchanging number which means 'number'.

    ; : Terminator

    This is very VERY important. When you forget this to put in the end of statement, it occurs an error. Because, without semicolon, the programme doesn't know where is the end of statement. You MUST end each statement with a semicolon. This rule affects to other programming like C / C++ as well.

    + Additional Element

    //, /*~*/ : Comment

    You can add comments to your expressions to explain the purpose. The maya programme ignores the following comments when you put '//'.
    If it is a single line :
          If (frame == 0) Ball.scaleY=5; // initialization
    If it is a multi line :
          /* 
               This is an example of multi-line comments
               Blah blah blah
          */


    Reference
    • Jeon Gye do, 2000. MEL 4 Artists. [online] Available at: <http://gyedo.pe.kr/zbxe/mayaExpression> [Accessed 25 February 2011]

    Why using MEL & expressions?

    In this blog, you will explore mel scripting and expressions for maya work. It will be focused on maya's particle system using mel script and expression. Also I will analyze number of MEL scripts already exist to get ideas of how it works.

    So, what is MEL and expressions?

    MEL stands for Maya Embedded Language. MEL is a scripting language which can embody "open architecture" of maya. By using MEL, user can control maya functions directly/indirectly. Even maya's GUI (graphic user interface) can be controlled by MEL. Therefore user can add new functions that maya doesn't have OR  customize GUI as their needs.

    Expression controls attribute of object. User can control an animation which cannot be key framed (e,g. particle). Using expression is similar to script MEL.


    There are differences between MEL and expression.

    MEL is more likely completely independent programme. Expression is a correlation with objects.
    MEL needs complete structure of grammar. Expression needs only the least rules.
    MEL is executed no matter animation is played or not. Expression is executed only while animation playing.
    MEL is saved separately with the scene. Expression is saved as a part of the scene.
    MEL access to the attribute indirectly. Expression access to the attribute directly.

    What you can do by using MEL and Expression.

    MEL : control an attribute of object accurately, create new macro, create new user interface, customize maya GUI.

    Expression : control attributes of object apart from key framing by numerical expression, control attributes by conditions, It can use MEL command in expression. However, it can't control the attribute that controlled by existing key, set driven key,  constraint, motion path or other expression. It can occur an error if you run MEL commands such as connection/disconnection of attribute or creation/deletion of object within the expression.


    Grammar of MEL is very similar to other programming languages like C, C++. Not only the MEL, most script based languages are descended from C. It is not essential to learn programming language for MEL. Although if you have experience with scripting language, it will be easier to understand the structure.


    Reference
    • Kian Bee Ng., 1999. Digital Effects Animation Using Maya. Rockland: Jenifer L.Niles
    • Jo Sang Bum., 2002. programming with MAYA MEL & Expression. Seoul: Ahn Dae Sik
    • Mark R.Wilkins and Chris Kazmier., 2003. MEL Scripting for Maya Animators. SanFrancisco: Diane D. Cerra
    • Autodesk Maya 2011, 2010. Autodesk Maya Online Help : Introduction. [online] Available at : < file:///Applications/Autodesk/maya2011/docs/Maya2011/en_US/index.html?url=./files/GS_Introduction.htm,topicNumber=d0e1838 > [Accessed 25 February 2011].
    • Marc-André Guindon., 2005. Learning Maya 7 : The Special Effects Handbook. Unknown: Sybex
    • Jeon Gye do, 2000. MEL 4 Artists. [online] Available at: <http://gyedo.pe.kr/zbxe/mayaExpression> [Accessed 25 February 2011]

    01 February 2011

    Idea and Storyboard

       In the first term of this academic year, I had a chance to use simple expression for spinning pin wheel for our project. Since then I tried to study MEL scripting and expression. Luckily, I could choose any subject I want to study more, so I have chosen exploring Particle Systems using MEL and expression.

       When I thought about particle systems, I could only think about water dropping, smoke or explosion and it didn't draw my interest. Then I was watching BBC or National Geographic documentary, there was a scene that flower petals were blew away by the wind. It didn't come to my head instantly but after few days it came to my mind and I could choose a subject to experiment connecting some animated object to the particles.  I guess the image of the flower was quiet pierce. After that I thought of an image the flock of butterflies flying out from a flower when its open.


    Also I can use the flower model I made a year ago.